Create a project
See Projects to learn more about this fundamental element of the Quote to Cash cycle.
To create a project, do the following:
-
Click
 Projects on the side panel to open the Projects view and then click New Project.
The New Project form displays.
-
Complete the form. See Field descriptions for more information.
-
Click Save and the new project will be added to the Projects view.
Field descriptions
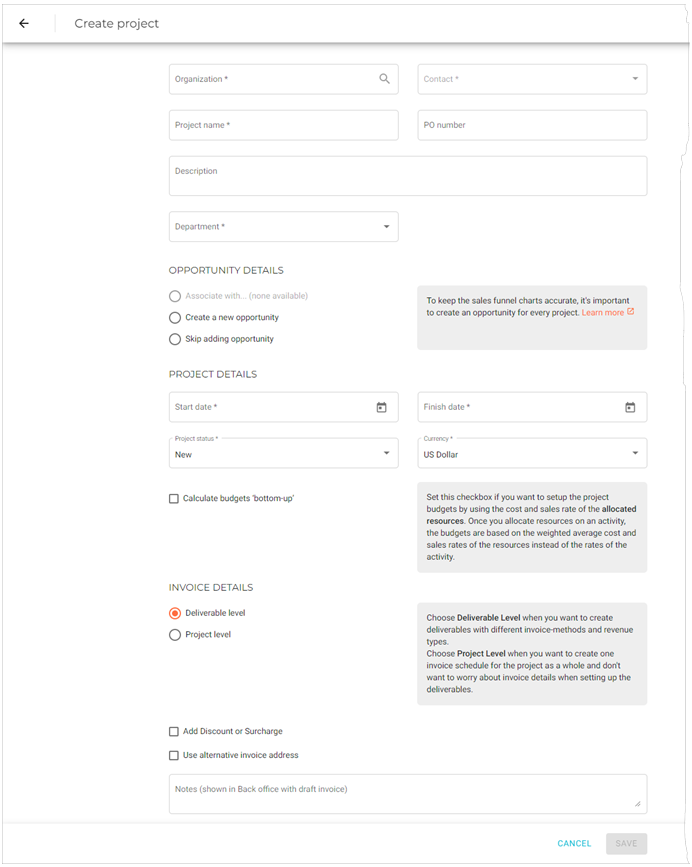
| Field name | Description | Required? | ||||
|---|---|---|---|---|---|---|
|
Begin typing the name of the organization sponsoring the project. If the organization exists in your Organizations database, it will appear in this field. If the organization does not exist in the database, click Create New Organization. See Create an organization for more information. |
Y |
||||
|
This drop-down list will be populated with the name of the contact person(s) of the organization you selected in the Organization field. If there is no contact person, click Add New Contact to add one. |
Y |
||||
|
Enter a short phrase that describes the project. |
Y |
||||
|
If you have a purchase order for this project, enter its PO number in this field. |
N |
||||
|
Use this field for a short declaration about the objectives of the project or any other relevant information about the project that it might be useful for your team members to know. |
N |
||||
|
The department associated with the project. |
Y |
||||
|
Select the appropriate checkbox:
|
Y |
||||
|
Choose when the project should begin and end. |
Y |
||||
|
Select the status from the drop-down list. Possible choices are:
|
Y |
||||
|
Choose the appropriate currency from the drop-down list. |
Y |
||||
|
Select this option if this project has at least one Time & Materials deliverable and you want the client to approve the time entries associated with it.
|
N |
||||
|
Select this checkbox if you want to set up the project budget using the cost and sales rate of the allocated resources. Once you allocate resources on an activity, the budget will be based on the weighted average of the cost and sales rates of the resources instead of the rates of the activity. In order to see this checkbox it must be activated in the back office first. |
N |
||||
|
If you want to use a different invoice method or revenue type for each deliverable, select Deliverable Level, which is the default setting. If you want to create one invoice schedule for the project as a whole and you don’t want to worry about invoice details when creating a deliverable, select Project Level. |
|||||
|
If you select this option, you must then select the type of transaction: If you choose
If you choose
|
N |
||||
|
If you select this option, an additional section will display with the following fields:
|
N |
||||
|
Enter any relevant information about the project that you think the customer should know. This information will appear on the customer’s invoice. |
N |